
Sushi bake is a modern twist on traditional sushi, combining the flavors of sushi rolls into a comforting casserole. This easy-to-make sushi bake recipe brings together seasoned rice, creamy seafood fillings, and crispy toppings, all baked together in one dish. If you’re someone who loves the flavors of sushi but finds rolling complicated, this sushi bake recipe is a perfect solution. Whether you’re a beginner or a sushi enthusiast, you’ll love this simple yet flavorful dish. You can even experiment with variations of the sushi bake recipe depending on your personal preferences.
Ingredients for Your Sushi Bake Recipe:
When preparing a sushi bake recipe, the choice of ingredients is key. You’ll need seasoned sushi rice, a creamy seafood filling, and crispy toppings. Whether you’re using salmon, crab, or a combination, the ingredients will create a rich and savory base for your sushi bake. In this sushi bake recipe, we’ll show you how to balance these flavors for the perfect sushi-inspired dish.
How to Prepare Your Sushi Bake Recipe:
Making a sushi bake recipe is easier than you think. First, prepare the sushi rice according to the instructions, seasoning it with rice vinegar, sugar, and salt. Then, assemble your seafood and other fillings into the casserole dish. Layer the rice, add the fillings, and top with your favorite sauce and seasonings. Baking the mixture will result in a satisfying, baked sushi dish. This sushi bake recipe is not only simple but can be easily adapted for different tastes.
What is Sushi Bake?
Sushi bake is a modern, oven-baked version of traditional sushi. Instead of rolling the ingredients, you simply layer them in a casserole dish and bake. The dish features seasoned sushi rice, seafood like crab or salmon, and creamy fillings. Additionally, toppings such as spicy mayo and furikake enhance the flavor.
- Sushi-making techniques or history:
The Spruce Eats – Sushi Basics - Seafood sourcing or sustainability:
Seafood Watch – Sustainable Seafood Choices - Nori Sheets and their origins:
Japan Centre – Nori Sheets and How to Use Them
This method makes sushi bake easier to prepare compared to traditional sushi. In fact, you don’t need to be skilled in rolling sushi. As a result, sushi bake offers a warm, cheesy, and savory alternative that’s both satisfying and simple to make.
Origins of Sushi Bake
Sushi bake first emerged in the Philippines. It’s a fusion of Japanese sushi and Filipino casserole dishes, combining the best of both culinary traditions. Over time, it gained popularity and went viral on social media. Consequently, it became a beloved dish in many households around the world.
How Sushi Bake Differs from Traditional Sushi
While sushi rolls require careful rolling and slicing, sushi bake is much simpler. Instead of rolling the ingredients, you layer them in a casserole dish. This means you can prepare it more quickly, making it a great choice for busy days.
Why Sushi Bake is So Popular
Sushi bake has gained popularity due to its simplicity and versatility. Moreover, it’s an ideal dish for both beginners and experienced cooks. You can easily customize the recipe to suit your tastes. Ultimately, it’s perfect for family meals, parties, or gatherings.
Origins of Sushi Bake
Sushi bake originated in the Philippines, where Filipino home cooks sought a way to enjoy sushi in a simpler, more accessible format. Drawing inspiration from Japanese sushi and Filipino casserole dishes, they combined the flavors of sushi with the ease of casserole preparation. Filipino cuisine often features hearty, layered dishes like baked macaroni and lasagna, so adapting sushi to a baked dish made perfect sense.
Home cooks began layering seasoned sushi rice, seafood like crab or salmon, and creamy fillings in a casserole dish. They topped the creation with spicy mayo and furikake, resulting in a comforting, baked version of sushi. This method made sushi easier to prepare, appealing to people who were not familiar with rolling sushi or handling raw fish.
Social Media Influence
Sushi bake gained rapid popularity, largely due to its visibility on social media. Filipino food bloggers, Instagram influencers, and home chefs shared their own takes on the dish, helping it go viral. The dish’s appealing visual presentation and creamy texture made it perfect for sharing on platforms like Instagram and Facebook, which helped spread its fame far beyond the Philippines.
Global Popularity
After taking off in the Philippines, sushi bake gained global recognition. People from different parts of the world began to try it, often adding their own twists to the recipe. The dish’s flexibility and ease of preparation contributed to its widespread popularity, and today, sushi bake is beloved by food enthusiasts around the globe.
Simplified Preparation Process
Sushi bake stands out from traditional sushi mainly because it simplifies the preparation process. Traditional sushi requires rolling vinegared rice, seafood, and vegetables in a sheet of nori. You need skill and patience to create perfect sushi rolls. The process also demands precision to ensure each piece holds together and the ingredients stay evenly distributed.
In contrast, sushi bake skips all that complexity. Instead of rolling individual sushi pieces, you layer the ingredients in a casserole dish. Start with seasoned rice as a base, then add seafood like crab, salmon, or shrimp. Top it with creamy fillings such as mayo and cream cheese. You then bake the dish, allowing the flavors to meld together.
Cooking and Ingredient Differences
Another major difference lies in the ingredients. Traditional sushi typically uses raw fish, which some people may find intimidating or unappealing. Sushi bake, on the other hand, often uses cooked or imitation seafood. This makes the dish more accessible, especially for those who are not comfortable with raw fish or who prefer cooked meals.
Additionally, sushi bake often incorporates creamy fillings and a cheese topping, which adds richness and a comforting texture. The result is a warm, hearty dish, in contrast to the lighter, fresher experience that traditional sushi offers.
Texture and Serving Style
The texture of sushi bake is another factor that sets it apart. In traditional sushi, you enjoy a delicate balance of soft, vinegared rice, and crunchy seaweed. Sushi bake, however, has a creamy, casserole-like texture. The rice becomes tender and slightly crispy on the edges, while the seafood and creamy fillings form a rich, melty topping.
Sushi bake also serves as a larger, shareable dish, perfect for family meals or parties. Traditional sushi is typically prepared in small, individual portions. Sushi bake’s ease of preparation and larger servings make it a more social and casual meal option.
The Comforting Factor
Sushi bake is a comforting, hearty alternative to traditional sushi. It’s a warm, filling dish that’s perfect for those who enjoy cozy meals. The baking process gives it a satisfying, golden-brown top, which adds both texture and flavor. While traditional sushi focuses on fresh, bite-sized pieces, sushi bake provides a rich, filling experience that works well for larger gatherings or casual dining.
Why It’s So Popular and Easy to Make
Sushi bake has become a favorite in many households and food communities due to its ease of preparation and wide appeal. The dish combines the delicious flavors of traditional sushi but in a more convenient, simplified format, which makes it incredibly popular, especially for those who are new to sushi or want to enjoy it in a more relaxed setting. Let’s break down why this dish has captured the hearts of so many.
Simple Ingredients, Easy Preparation
One of the main reasons sushi bake has become so popular is that it doesn’t require specialized ingredients or skills. Traditional sushi involves raw fish, seaweed, and a precise rolling technique. For many, this can be intimidating or difficult to execute. Sushi bake, however, is made with readily available ingredients like cooked seafood (often imitation crab, shrimp, or salmon) and a variety of creamy fillings such as mayonnaise, cream cheese, and spicy sauces. These ingredients are easy to find at most grocery stores, meaning you don’t have to search for rare or expensive items.
The preparation process is also a breeze. Instead of carefully assembling individual sushi rolls, all you need to do is layer the ingredients in a casserole dish and bake. This significantly cuts down the time and effort needed to prepare the meal. No need for rolling mats or complex techniques, making it a great option for beginners or anyone short on time.
Customizable and Adaptable
Another reason sushi bake has gained so much popularity is its versatility. Once you understand the basic concept, you can customize the dish to suit any taste or dietary preference. You can experiment with different types of seafood, such as crab, tuna, or even vegetarian options like avocado or roasted vegetables. You can adjust the level of spice by using more or less sriracha in the mayo or adding extra seasoning with wasabi or soy sauce.
This flexibility allows sushi bake to appeal to a wide range of people. Whether you’re feeding a family, a crowd, or just preparing a meal for yourself, sushi bake can be easily adapted to suit everyone’s tastes. Additionally, it works well with gluten-free or dairy-free alternatives, making it an inclusive option for those with dietary restrictions.
Social Media Influence
In addition to being simple and customizable, sushi bake’s visual appeal has contributed to its rise in popularity. The dish’s golden-brown, bubbly top and vibrant ingredients make it visually striking, making it ideal for sharing on social media platforms like Instagram. Food bloggers, influencers, and home cooks have embraced sushi bake, showcasing their own creative variations. The dish’s eye-catching appearance, combined with its easy preparation, has led to viral trends, inspiring people all over the world to give it a try.
Perfect for Large Gatherings and Casual Meals
Sushi bake is not only easy to make, but it’s also perfect for family gatherings or casual get-togethers. Since it’s baked in a single dish, it’s great for serving a large group of people. It can be a centerpiece for a meal, offering a hearty, comforting option that everyone can dig into. Whether you’re hosting a party, potluck, or dinner with friends, sushi bake is a crowd-pleaser that satisfies both sushi enthusiasts and those new to the dish.
The dish’s versatility extends beyond just flavor and dietary preferences. It can be made in advance and stored in the fridge, making it a fantastic option for meal prep or leftovers. This adds to its convenience, making it even more popular for busy people looking for an easy yet flavorful meal option.
Comfort Food with a Twist
At its core, sushi bake offers comfort food with a sushi twist. It combines the best aspects of Japanese sushi—rice, seafood, and seasoning—with the hearty, satisfying qualities of a baked casserole. The warm, cheesy top and soft rice provide a sense of comfort that traditional sushi, with its cold and delicate texture, doesn’t always offer. It’s the perfect dish for those who enjoy the flavors of sushi but prefer a more filling, homey experience.
Essential Ingredients for a Perfect Sushi Bake
Creating a delicious sushi bake starts with choosing the right ingredients. While sushi bake is highly customizable, there are a few essential components that will ensure your dish is flavorful, satisfying, and true to the concept of sushi. Let’s take a closer look at the key ingredients you’ll need to assemble a perfect sushi bake.
Sushi Rice
At the heart of every sushi bake is sushi rice, which forms the base layer of the dish. Sushi rice is short-grain rice known for its sticky texture, which makes it perfect for pressing into a casserole dish and holding everything together. The rice is seasoned with a mixture of rice vinegar, sugar, and salt to give it the characteristic tangy flavor that balances the richness of the other ingredients.
For the best results, it’s important to use sushi rice specifically, as it holds the right texture and consistency. Regular white rice won’t give you the same sticky and slightly chewy texture. Be sure to cook the rice according to the package instructions, and don’t forget to let it cool slightly before layering it in your casserole dish to prevent it from becoming too mushy.
Seafood or Fish
Sushi bake typically features cooked seafood, which can include options like imitation crab meat, shrimp, salmon, or even tuna. The seafood provides the signature savory and slightly sweet flavors that complement the tangy rice. The type of seafood you choose can depend on personal preference or what you have available.
- Imitation Crab (Kani): This is one of the most common ingredients in sushi bake. It’s affordable, easy to use, and has a mild, slightly sweet flavor that pairs well with the other ingredients. Some sushi bake recipes use shredded imitation crab mixed with a creamy sauce for extra richness.
- Shrimp or Salmon: Shrimp adds a nice bite, and salmon gives a richer, buttery flavor. Both options are excellent choices if you prefer real seafood in your dish. You can use cooked or pre-cooked shrimp, and salmon can be baked or broiled.
- Tuna: For a more robust flavor, some recipes use canned tuna. Tuna adds a deep, savory taste to the dish and works especially well in spicy variations of sushi bake.
Creamy Sauce
One of the elements that really sets sushi bake apart from traditional sushi is the creamy sauce that binds everything together. The sauce adds flavor and moisture to the dish while helping the ingredients meld into a cohesive, baked casserole.
- Mayonnaise: A classic component, mayonnaise is often combined with other ingredients to create a creamy base for the dish. You can use regular mayo or Japanese mayonnaise, which is slightly sweeter and creamier.
- Cream Cheese: For extra richness and smoothness, cream cheese is frequently added. It pairs perfectly with the seafood and rice, creating a luxurious texture when baked. This is an optional ingredient, but it makes a significant difference in the final result.
- Spicy Mayo: For a bit of heat, you can make spicy mayo by mixing mayonnaise with sriracha sauce or another hot sauce. This variation adds a nice kick to the dish and complements the creamy base. Many people also top their sushi bake with extra spicy mayo after baking for added flavor.
Furikake or Toppings
Furikake is a Japanese seasoning blend that adds a burst of flavor to sushi bake. It often contains seaweed, sesame seeds, and fish flakes—ingredients that enhance the umami flavor of the dish. Sprinkling furikake on top of the rice before baking gives it a nice, savory crunch that balances the creaminess of the sauce and seafood.
Other topping options might include:
- Sliced Avocado: Sliced or mashed avocado adds a creamy texture and a fresh contrast to the baked ingredients. Its mild flavor works well with the savory seafood.
- Green Onions or Chives: Chopped green onions or chives add freshness and a slight crunch, enhancing the dish’s flavor profile. They also offer a pop of color for visual appeal.
- Panko Bread Crumbs: Some variations use panko breadcrumbs on top to create a crispy, golden-brown crust. These breadcrumbs can be lightly toasted to add crunch, making the texture even more satisfying.
Nori (Seaweed)
Although sushi bake is traditionally a “deconstructed” version of sushi, it’s still customary to include nori (seaweed) in some form. While sushi bake doesn’t require rolling with nori like traditional sushi, it’s often served with nori sheets on the side. Diners can break off pieces of nori and use them to scoop up the sushi bake or wrap portions of the casserole, mimicking the traditional sushi experience.
For an added twist, some people incorporate crumbled nori directly into the casserole or sprinkle it on top as a garnish before serving. It gives the dish an additional layer of flavor and a hint of the sea.
Seasonings and Sauces
Seasonings are key to bringing all the ingredients together. In addition to rice vinegar used to season the rice, many recipes also call for:
- Soy Sauce: For an extra layer of salty, savory flavor, a splash of soy sauce is often mixed into the creamy sauce or drizzled over the baked dish before serving.
- Wasabi: A bit of wasabi in the creamy sauce or served on the side gives the dish a zesty, spicy punch that pairs well with the richness of the other ingredients.
- Lemon or Lime: A squeeze of fresh citrus juice adds brightness and cuts through the richness of the creamy sauce and seafood, bringing balance to the dish.
Choosing the Right Sushi Rice
Sushi rice is the foundation of any sushi bake, so selecting the right rice is crucial to achieving that authentic, sticky texture and delicate flavor. While it might seem like any type of rice could work, sushi rice is specially designed to meet the needs of sushi and sushi bake dishes. Let’s explore why choosing the right sushi rice matters and how you can ensure your dish turns out perfectly.
What Makes Sushi Rice Special?
Sushi rice is a type of short-grain rice known for its sticky texture and slightly chewy consistency. This texture is essential for holding the other ingredients in place and providing the right balance of flavor. It differs from long-grain rice, which has a fluffier texture and doesn’t hold together as well. The short grains of sushi rice contain more starch, making it sticky when cooked. This stickiness allows it to mold together and form the perfect base for your sushi bake.
After cooking, you season sushi rice with a mixture of rice vinegar, sugar, and salt. This seasoning gives sushi rice its characteristic tangy, slightly sweet flavor, which balances out the richness of the creamy sauces and seafood in a sushi bake. If you used regular white rice, the dish would lack that signature sushi flavor, and the rice wouldn’t hold together as well during baking.
Types of Sushi Rice
Not all sushi rice is the same. Here are the key types of sushi rice you might come across and why they are suitable for your sushi bake:
- Japanese Short-Grain Rice: The most traditional option, Japanese short-grain rice is specifically grown for sushi. It’s the preferred choice because of its perfect texture and ability to hold together while absorbing the seasoning. If you want a truly authentic sushi bake, this is the rice to use.
- Calrose Rice: Calrose rice, a variety of short-grain rice grown in the United States, is another popular choice for sushi. It has similar characteristics to Japanese rice, including the sticky texture and short-grain size. While not as traditional as Japanese rice, Calrose rice offers a more affordable and accessible option if you’re unable to find Japanese rice in your area.
- Other Short-Grain Rice Varieties: Some grocery stores may carry other short-grain rice varieties suitable for sushi bake. While these rice types might not be labeled as “sushi rice,” they often have the sticky texture necessary for the dish. Look for rice with a starch content that will help it hold together after cooking.
How to Cook Sushi Rice for Sushi Bake
Once you’ve selected the right type of rice, cook it properly to ensure the perfect texture. Follow these tips for cooking sushi rice for your sushi bake:
- Rinse the Rice: Sushi rice has excess starch that can make it too sticky. Rinse the rice under cold water until the water runs clear. This step helps remove the excess starch and prevents the rice from becoming too gooey.
- Use the Right Water-to-Rice Ratio: Sushi rice requires a specific water-to-rice ratio to cook properly. Typically, the ratio is 1:1.2 (1 cup of rice to 1.2 cups of water), but this can vary slightly depending on the brand and type of rice. Follow the instructions on the rice package for the most accurate results.
- Let the Rice Sit: After cooking, let the rice sit for about 10-15 minutes to steam. This helps it firm up, ensuring the right texture for your sushi bake.
- Season the Rice: Sushi rice is flavored with a mixture of rice vinegar, sugar, and salt. For every cup of rice, use about 2 tablespoons of rice vinegar, 1 tablespoon of sugar, and 1 teaspoon of salt. Stir the seasoning into the warm rice to coat it evenly, then let it cool to room temperature before assembling your sushi bake.
Why Not Use Regular Rice?
You might wonder why regular white rice isn’t recommended for sushi bake. The primary reason is that regular rice is typically long-grain, which doesn’t have the sticky texture required for sushi bake. Without that texture, the rice won’t hold together during baking, resulting in a sloppy, messy dish. Additionally, regular rice doesn’t absorb the vinegar, sugar, and salt mixture as well as sushi rice does, which could lead to a bland dish.
Another downside is that regular rice won’t provide the authentic sushi flavor. Sushi rice’s seasoning adds a tangy kick that complements the creamy sauces and seafood in the sushi bake, something that regular rice cannot replicate.
How to Choose the Best Sushi Rice for Your Needs
When selecting sushi rice, consider factors such as:
- Availability: If you live near an Asian grocery store, finding Japanese sushi rice or Calrose rice should be easy. If not, look for short-grain rice at your local grocery store, which will work well in your recipe.
- Budget: Japanese sushi rice can be a little pricier than other varieties. If you’re on a budget, Calrose rice is an excellent alternative that still provides the sticky texture you need for sushi bake.
- Quality: Quality can vary between brands. For the best results, choose high-quality sushi rice from trusted brands.
Choosing the right sushi rice is essential for making a sushi bake that holds together well and delivers the traditional flavors of sushi. Using authentic sushi rice or a suitable substitute like Calrose rice ensures that your sushi bake has the perfect texture and flavor, laying the groundwork for a delicious dish.
Protein Options: Salmon, Crab, or Both?
Choosing the right protein is essential when making a sushi bake. Popular options include salmon, crab, or a combination of both. Each protein brings a unique flavor and texture to the dish. Let’s take a look at each option to help you decide.
Salmon: A Rich, Flavorful Choice
Salmon is one of the most popular proteins in sushi bakes. It has a rich, buttery texture and a mild flavor that works well with the other ingredients. When baked, it becomes tender and flakey. This texture contrasts beautifully with the slightly crispy top of the sushi bake. The pink hue of salmon also makes the dish visually appealing.
Why Choose Salmon?
- Flavor: Salmon’s delicate richness complements the tangy sushi rice and creamy sauces.
- Texture: The fat content keeps it moist and tender, offering a satisfying mouthfeel.
- Versatility: Salmon pairs well with a variety of sauces, like spicy mayo or soy sauce.
For preparation, you can use fresh or smoked salmon, or bake or sear it beforehand. Ensure that your salmon is sushi-grade if using raw fish.
Crab: Sweet and Tender
Crab is another great option. It has a sweet and delicate flavor that contrasts well with the other ingredients. You can use imitation crab (surimi), which is often more affordable, or fresh crab meat for a more authentic taste. Either option provides a tender texture that works well in sushi bakes.
Why Choose Crab?
- Flavor: Crab’s subtle sweetness balances the rich salmon and tangy sushi rice.
- Tenderness: The meat is light and flaky, offering a soft bite.
- Affordability: Imitation crab is a budget-friendly choice, without sacrificing flavor.
For preparation, shred or chop the imitation crab or remove the meat from fresh crab. Then, mix it with your favorite sauce for added flavor.
Both: Combining the Best of Both Worlds
If you can’t choose, consider using both salmon and crab. This combination creates a dynamic flavor profile. The richness of salmon balances the sweetness of crab, providing variety with every bite. The combination also makes the dish more visually appealing.
Why Choose Both?
- Balanced Flavor: The richness of salmon and sweetness of crab complement each other perfectly.
- Variety in Texture: Enjoy the tender flakiness of salmon and the firmer texture of crab.
- Visual Appeal: The pink of salmon and the white of crab create a beautiful contrast.
Layer the proteins in the bake or mix them together. Both methods work well, depending on your presentation and texture preferences.
Which Protein Should You Choose?
Decide based on your flavor preference:
- Salmon provides richness and a creamy texture.
- Crab offers a lighter, sweeter flavor.
- Both give a varied, balanced flavor and texture experience.
Must-Have Toppings: Kewpie Mayo, Sriracha, and Furikake
Toppings are essential to elevating your sushi bake, adding layers of flavor and texture that enhance the overall experience. While the core ingredients provide the foundation, the right toppings can make your sushi bake irresistible. Among the most popular toppings are Kewpie mayo, Sriracha, and furikake. These ingredients work together to create a delightful combination of creamy, spicy, and umami flavors that take your dish to the next level. Let’s explore why these toppings are must-haves for a perfect sushi bake.
Kewpie Mayo: Creamy and Rich
Kewpie mayo is a Japanese mayonnaise known for its rich, creamy texture and slightly tangy flavor. It’s made with egg yolks instead of whole eggs, which gives it a smoother consistency. This mayo is a favorite in sushi dishes because it adds a deliciously velvety mouthfeel that perfectly complements the sushi rice and proteins in a sushi bake.
Why Choose Kewpie Mayo?
- Creaminess: Kewpie mayo adds a rich, smooth creaminess that enhances the overall texture of the sushi bake.
- Flavor: Its slightly tangy flavor balances the savory and umami flavors of the dish.
- Authenticity: Kewpie mayo is widely used in Japanese cuisine, making it an essential ingredient for sushi-inspired dishes.
To use Kewpie mayo, simply drizzle it over the top of your sushi bake before placing it in the oven. The mayo will melt slightly during baking, creating a smooth, creamy layer on top of your sushi bake.
Sriracha: Spicy Kick
For those who love a bit of heat, Sriracha is a must-have topping. This spicy chili sauce brings a zesty, bold kick to your sushi bake, balancing the richness of the mayo with its sharp, fiery flavor. Sriracha is made from a blend of chili peppers, garlic, and vinegar, giving it a unique, tangy heat that pairs perfectly with the creamy mayo and the savory flavors of the fish and rice.
Why Choose Sriracha?
- Spicy Heat: Sriracha adds a bold, spicy kick that enhances the overall flavor profile of the sushi bake.
- Tangy Flavor: The vinegar and garlic in Sriracha provide a tangy depth that contrasts beautifully with the creamy mayo.
- Versatility: Sriracha can be used as a drizzle on top or mixed into the mayo for a spicier creamy sauce.
You can drizzle Sriracha directly over the sushi bake for an eye-catching, spicy finish. Alternatively, mix it with Kewpie mayo to create a spicy mayo that you can spread evenly across the dish before baking.
Furikake: Umami and Crunch
Furikake is a Japanese seasoning that combines various ingredients, including seaweed, sesame seeds, and fish flakes, all mixed together to create a unique umami-packed topping. It adds a savory, slightly salty flavor with a crunchy texture that contrasts wonderfully with the creamy and spicy elements in the sushi bake. Furikake brings an authentic Japanese touch to the dish, amplifying the umami notes in the proteins and rice.
Why Choose Furikake?
- Umami Flavor: Furikake is packed with umami, the savory flavor that enhances the taste of the fish, rice, and other ingredients in the sushi bake.
- Texture: The sesame seeds and seaweed provide a satisfying crunch that contrasts beautifully with the soft, creamy ingredients.
- Authenticity: Furikake is commonly used in Japanese cuisine, adding an authentic flair to your sushi bake.
Sprinkle a generous amount of furikake on top of your sushi bake just before serving. The crunchy texture of the sesame seeds and the salty, umami-rich flavor of the seaweed create a delightful contrast to the creamy and spicy components.
Why These Toppings Work Together
Kewpie mayo, Sriracha, and furikake are a match made in heaven when it comes to sushi bakes. The rich creaminess of the mayo balances the spicy kick from the Sriracha, while the umami-packed furikake adds depth and texture. Together, these toppings create a well-rounded flavor experience, with each component complementing the others and bringing out the best in the sushi bake.
Tips for Using These Toppings
- Adjust Spice Levels: If you prefer a milder flavor, reduce the amount of Sriracha or mix it with Kewpie mayo to create a spicy mayo with less heat.
- Customize with Additional Toppings: While Kewpie mayo, Sriracha, and furikake are classic, feel free to experiment with other toppings like pickled ginger, eel sauce, or masago for added variety.
- Layering: For a more even distribution of flavors, layer the toppings throughout the sushi bake. You can spread a bit of mayo and Sriracha between the layers of rice and fish for extra creaminess and spice.
Nori Sheets: The Perfect Pairing for Serving
Nori sheets play an essential role in sushi bakes, contributing both flavor and texture. This dried seaweed, typically used in traditional sushi rolls, pairs beautifully with the rich, creamy ingredients of a sushi bake. Crispy, salty, and umami-rich, nori helps balance the savory elements in the dish while enhancing the overall flavor.
Why Nori Sheets Are Essential
Nori adds much more than just visual appeal. It’s an integral component that enhances flavor and texture, making it an indispensable part of sushi bake recipes.
Flavor Enhancement
Nori’s salty, earthy taste brings out the umami richness in sushi bakes. The creamy components, such as mayo and fish, are nicely balanced by the savory kick nori offers. This flavor balance is key to achieving a well-rounded sushi bake.
- Salty Contrast: Nori’s saltiness cuts through the richness of creamy ingredients like mayo and avocado.
- Umami Boost: The seaweed’s natural umami flavor intensifies the dish’s taste, especially when paired with fish.
Texture Contrast
The texture of nori is another reason it’s so popular. When served crisp before baking, it provides a crunchy contrast to the softer, creamier layers of the sushi bake. After baking, nori softens slightly, but still retains a chewy texture that adds variety to each bite.
- Crispy Texture: Before baking, nori offers a satisfying crunch.
- Chewy Finish: After baking, the nori softens and contrasts the creamy fillings.
How to Use Nori Sheets for Sushi Bake
Nori sheets can be used in different ways, depending on your preference for texture and presentation.
Layering Beneath the Bake
For a more traditional feel, nori can be layered beneath the sushi rice and other fillings. This mimics a traditional sushi roll, but with a baked twist. The nori absorbs the flavors and moisture from the bake, creating a deliciously flavorful bottom layer.
- Base Layer: Use nori as the foundation, placing it at the bottom before adding rice and fillings.
- Flavor Absorption: The nori soaks up flavors as the bake cooks, enhancing its taste.
Sprinkling Over the Top
After the sushi bake is cooked, you can tear nori sheets into small pieces and sprinkle them over the top for a crispy garnish. This method ensures the nori stays crisp, adding a delightful crunch and extra flavor to the dish.
- Crisp Topping: Tear or cut nori into strips and sprinkle over the bake after cooking.
- Flavor Without Overpowering: This method adds a light, salty touch while maintaining a crunchy texture.
Rolling the Sushi Bake
For a fun and creative twist, consider rolling individual portions of the sushi bake in nori sheets, similar to traditional sushi rolls. This method is perfect for creating a handheld sushi experience and works well for parties or casual meals.
- Handheld Rolls: Wrap portions of sushi bake in nori for easy-to-eat rolls.
- Personalized Servings: Customize servings for guests, offering each person their own sushi bake roll.
Alternatives to Nori Sheets
If you prefer not to use nori, there are alternatives, though they may not provide the same depth of flavor:
- Rice Paper: This offers a neutral flavor and chewy texture, though not as flavorful as nori.
- Lettuce Wraps: For a lighter, non-seafood option, try using lettuce leaves as a substitute for nori.
Tips for Using Nori Sheets
- Storage: Keep nori sheets in a cool, dry place to maintain crispness.
- Toasting: Briefly toast nori for extra flavor and texture.
- Layering with Toppings: Consider pairing nori with sesame seeds, avocado, or sriracha for added variety and flavor.
Step-by-Step Guide: How to Make Sushi Bake at Home
Making sushi bake at home is a fun and rewarding experience, and the best part is, it’s easier than you might think! Whether you’re a sushi enthusiast or someone who enjoys trying new recipes, sushi bake offers a delicious twist on traditional sushi that you can prepare in your kitchen. Below is a step-by-step guide to help you create the perfect sushi bake from scratch.
Step 1: Prepare the Sushi Rice
The base of any great sushi bake is perfectly cooked sushi rice. Sushi rice is sticky, slightly sweet, and perfectly seasoned to complement the other ingredients. Here’s how to prepare it:
- Rinse the Rice: Start by rinsing 2 cups of sushi rice under cold water. This helps remove excess starch and ensures the rice doesn’t become too sticky.
- Cook the Rice: Use a rice cooker or stove to cook the rice. The standard ratio is 1 cup of rice to 1.25 cups of water. Cook it according to the instructions for your rice cooker or follow stovetop methods until it’s soft and slightly sticky.
- Season the Rice: While the rice is still warm, mix in a seasoning of rice vinegar, sugar, and a pinch of salt. This gives the rice its signature sushi flavor.
Once done, set the rice aside to cool slightly. You want it to be warm but not hot when assembling the bake.
Step 2: Prepare the Protein Filling
Sushi bake can be made with a variety of proteins, but the most common ones are salmon, crab meat, or a combination of both. Here’s how to prepare them:
- For Salmon: If you’re using fresh salmon, bake or pan-fry it until it’s fully cooked. Then, shred the salmon into bite-sized pieces.
- For Crab: You can use imitation crab (kani) or real crab meat, depending on your preference. If you choose imitation crab, chop it into small pieces. If you’re using real crab, ensure it’s fully cooked and shredded.
- Combine with Mayonnaise: In a separate bowl, mix your protein with Kewpie mayonnaise, cream cheese, and a splash of soy sauce. This creates the creamy filling for the sushi bake.
Step 3: Assemble the Sushi Bake
Now that your rice and filling are ready, it’s time to assemble the sushi bake.
- Prepare a Baking Dish: Grease a baking dish or line it with parchment paper. You can use a 9×13-inch baking dish or any oven-safe casserole dish that’s big enough for your sushi rice and filling.
- Layer the Sushi Rice: Start by spreading the seasoned sushi rice evenly across the bottom of the dish. Press it down gently to create a solid, even layer.
- Spread the Protein Mixture: Next, spread the protein mixture (salmon, crab, or both) evenly over the top of the rice. Use a spatula to spread it into an even layer so every bite gets a delicious amount of filling.
- Top with Cheese (Optional): Some recipes call for a bit of shredded mozzarella cheese or a sprinkle of Parmesan on top for a cheesy finish. You can either bake it without cheese or add it for extra richness.
Step 4: Bake the Sushi Bake
Preheat your oven to 375°F (190°C). Once it’s ready, pop your sushi bake into the oven for about 15-20 minutes, or until the top is golden brown and the edges start to crisp up. The filling should be bubbling around the edges, signaling that the sushi bake is ready.
- Monitor Cooking Time: The baking time may vary depending on your oven and the thickness of your layers. Keep an eye on the top to ensure it doesn’t burn while it crisps up.
- Optional Broiling: If you prefer a slightly more crispy top, you can broil it for an additional 2-3 minutes. Just be sure to keep an eye on it so it doesn’t burn.
Step 5: Garnish and Serve
Once the sushi bake is golden brown and perfectly baked, it’s time to serve. Here’s how to finish it off:
- Top with Furikake: After baking, sprinkle the top with furikake (a Japanese seasoning made from dried seaweed, sesame seeds, and other flavorful ingredients). This adds an extra layer of umami and visual appeal.
- Drizzle with Sriracha Mayo: For a little heat, drizzle a mixture of sriracha and Kewpie mayonnaise over the top. You can adjust the spice level to your liking.
- Cut and Serve: Using a spatula, cut the sushi bake into squares or rectangles for easy serving. You can also serve it family-style and let everyone scoop out their portion.
Step 6: Enjoy!
Sushi bake is best served warm, so dig in while it’s fresh out of the oven! The crispy top, creamy filling, and flavorful nori sheets make every bite delicious.
Preparing and Seasoning the Rice
The rice is the foundation of any sushi dish, and when making sushi bake, it is no different. Properly prepared and seasoned rice is essential to creating the perfect sushi bake. Here’s how to prepare and season your rice for a sushi bake that will impress your guests.
Choosing the Right Rice
The first step in preparing sushi rice is choosing the right type of rice. For sushi bake, you’ll need short-grain or medium-grain rice, which is known for its stickiness and ability to hold together. Sushi rice has a unique texture that is essential for creating the right consistency and ensuring that the rice sticks together without being too dry or too wet. Jasmine rice or other long-grain varieties are not recommended as they lack the proper texture and stickiness for sushi.
Washing the Rice
Before cooking your rice, it’s important to wash it thoroughly. This step removes excess starch, which can cause the rice to become too sticky or clumpy during cooking. To wash the rice:
- Place the Rice in a Bowl: Put the sushi rice in a large bowl.
- Rinse Under Cold Water: Fill the bowl with cold water, and gently swirl the rice around. Drain the water and repeat the process 2-3 times, until the water runs clear.
- Soak the Rice: After rinsing, let the rice soak in fresh water for about 30 minutes. This allows the grains to absorb some water before cooking, which helps them cook evenly and results in a better texture.
Cooking the Rice
Once the rice has been rinsed and soaked, it’s time to cook it. You can either use a rice cooker or cook it on the stovetop. Here’s how to do it:
- Rice Cooker Method: If you’re using a rice cooker, follow the manufacturer’s instructions for cooking sushi rice. Typically, the ratio of rice to water is 1:1.25 (for every cup of rice, use 1.25 cups of water). Start the rice cooker and let it cook until the rice is soft and fluffy. Once cooked, allow the rice to sit for about 10 minutes to firm up slightly before seasoning.
- Stovetop Method: If you’re cooking the rice on the stovetop, add your soaked rice and the appropriate amount of water to a pot. Bring it to a boil over medium heat, then reduce the heat to low and cover the pot. Let it simmer for about 15-20 minutes, or until the rice is cooked through. After cooking, remove the pot from heat and let it sit, covered, for 10 minutes.
Seasoning the Rice
Once your rice is cooked and slightly cooled, it’s time to season it to give it that signature sushi flavor. The seasoning mix typically consists of rice vinegar, sugar, and salt, which gives the rice a slightly sweet, tangy, and savory flavor that perfectly complements the creamy fillings in a sushi bake. Here’s how to do it:
- Prepare the Seasoning Mix: In a small bowl, combine 2 tablespoons of rice vinegar, 1 tablespoon of sugar, and 1 teaspoon of salt. Stir the mixture until the sugar and salt dissolve completely.
- Warm the Mixture (Optional): For better dissolution, you can warm the vinegar mixture slightly in the microwave or in a small saucepan, but this step is optional. The goal is to dissolve the sugar and salt, not to cook the mixture.
- Add the Seasoning to the Rice: Gently fold the seasoning mixture into the cooked rice. Be sure to do this carefully and evenly, so the rice absorbs the seasoning and becomes evenly flavored.
- Cool the Rice: Allow the rice to cool slightly before using it in your sushi bake. The rice should still be slightly warm, as this helps the rice hold together better when layered with the other ingredients. Avoid using hot rice, as it may cause the sushi bake to become too runny.
Consistency of Sushi Rice
The texture of your rice is key to a successful sushi bake. The rice should be sticky but not overly wet, and it should easily hold together when pressed. The tangy-sweet seasoning complements the creamy toppings, while the slightly firm rice provides a good base for the sushi bake.
Tips for Perfect Sushi Rice
- Don’t Overmix: When seasoning the rice, avoid overmixing, as this can break the rice grains and make it too mushy.
- Use a Fan: In traditional sushi making, chefs use a fan to help cool the rice quickly, which gives it a shiny, glossy appearance. You can try using a fan (or a hand-held fan) to cool the rice and make it shine.
- Don’t Skip Soaking: Soaking the rice before cooking ensures that the grains cook evenly and absorb water properly, making them soft and sticky without becoming too mushy.
Flavor Variations for Sushi Rice
While the basic seasoning of rice vinegar, sugar, and salt is traditional, you can get creative with your sushi rice seasoning to match the flavor profile of your sushi bake:
- Add a Touch of Mirin: For extra sweetness and depth, you can add a little bit of mirin, a sweet rice wine used in Japanese cooking, to the seasoning mix.
- Include a Bit of Soy Sauce: Adding a small amount of soy sauce to the rice mixture can give it an extra savory umami boost, which pairs nicely with seafood-based sushi bakes.
- Citrus Zest: For a fresh twist, consider adding a bit of lemon or lime zest to the rice seasoning for a fragrant, citrusy note that can brighten up the dish.
Making the Flavorful Seafood Mixture
The seafood mixture is the heart of a sushi bake, bringing together a medley of flavors and textures that make this dish so irresistible. From the richness of crab and salmon to the creamy and savory additions of sauces and seasonings, crafting the perfect seafood mixture is key to a delicious sushi bake. Here’s a guide to making the flavorful seafood mixture that will elevate your sushi bake.
Choosing Your Seafood Base
The type of seafood you choose for your sushi bake mixture will greatly influence the flavor. Most sushi bakes feature crab or salmon, but you can also experiment with other seafood options, such as tuna, shrimp, or scallops, to create a custom flavor profile. Here’s a look at some popular options:
- Crab Meat: You can use imitation crab meat (also known as surimi) for a more affordable and readily available option, or opt for real crab meat if you want a more luxurious taste. Crab adds a sweet, delicate flavor that works well with the creamy sauce and rice.
- Salmon: Fresh salmon can be used either raw or cooked, depending on your preference. For a rich, slightly smoky flavor, smoked salmon also works wonderfully. The fattiness of salmon complements the creaminess of the mixture perfectly.
- Tuna: Fresh tuna is another great option, particularly if you enjoy a more robust seafood flavor. You can opt for sashimi-grade tuna for a fresh, tender bite.
- Shrimp: Shrimp adds a sweet and slightly firm texture to the mixture, and it pairs well with other seafood options like crab or salmon.
- Scallops: For a delicate, buttery taste, scallops can be a luxurious addition to your seafood mixture.
Preparing the Seafood
Before incorporating the seafood into your sushi bake, it’s important to prepare it properly. Here’s how to do it:
- For Imitation Crab: Shred the imitation crab meat into small pieces using your hands or a fork. It should resemble thin strands or chunks, allowing it to mix well with the other ingredients.
- For Salmon: If you’re using raw or cooked salmon, break it down into smaller flakes. You can cook it beforehand and shred it, or use fresh, raw salmon for a more delicate texture. If using smoked salmon, gently break it into bite-sized pieces.
- For Shrimp: If using shrimp, peel and devein them before cooking. You can boil or sauté the shrimp briefly until they turn pink. Once cooked, chop the shrimp into small pieces or leave them whole if you prefer larger bites.
- For Tuna or Scallops: For tuna or scallops, chop them into small, bite-sized pieces. If using raw tuna, ensure it’s sashimi-grade to guarantee freshness and safety.
Creating the Seafood Mixture
Once your seafood is prepared, it’s time to combine it with creamy, flavorful ingredients that will bring out the best in your chosen seafood. The key ingredients for the seafood mixture include mayonnaise, sriracha, and cream cheese. These ingredients provide richness, flavor, and a delightful creaminess that complements the tender seafood.
Here’s how to assemble the perfect seafood mixture:
- Cream Cheese: Start by softening cream cheese to room temperature so it blends easily. Cream cheese adds a smooth, rich texture and a subtle tang that balances the other flavors.
- Mayonnaise: Use Kewpie mayonnaise, a Japanese mayonnaise known for its extra creaminess and umami flavor. This type of mayo adds richness and depth to the mixture. You can also use regular mayo if Kewpie is unavailable, but Kewpie will give it a more authentic taste.
- Sriracha: To add a bit of heat and spice, sriracha is the perfect choice. The amount of sriracha can be adjusted based on your preferred spice level. Start with a teaspoon and add more if you like it spicier.
- Soy Sauce: A dash of soy sauce enhances the umami flavors and brings a savory depth to the mixture. Soy sauce balances out the creaminess and adds a subtle salty note that complements the seafood.
- Lemon Juice: A touch of lemon juice adds acidity and freshness to the mixture, helping to brighten up the flavors and keep them balanced.
- Garlic Powder and Onion Powder: These seasonings bring a mild savory and aromatic flavor to the mixture. You can adjust the amounts based on your taste preferences.
Combining the Ingredients
Once your base ingredients are prepared, it’s time to mix everything together:
- Mixing the Seafood with the Sauce: In a large bowl, combine your seafood of choice with the prepared mayonnaise, cream cheese, sriracha, soy sauce, lemon juice, garlic powder, and onion powder. Stir gently to combine, making sure the seafood is evenly coated with the sauce, but avoid overmixing, as this can break down the delicate seafood.
- Taste and Adjust: Taste the mixture and adjust the seasoning as needed. If you want more spice, add a little extra sriracha. If you prefer a richer taste, add a bit more mayonnaise or cream cheese. A small pinch of salt or pepper may also be needed to bring everything together.
Optional Additions to Elevate the Flavor
While the basic seafood mixture is delicious on its own, you can elevate the flavors by adding a few more ingredients:
- Cucumber or Avocado: For added texture, chop cucumber or avocado into small pieces and stir them into the mixture. These ingredients will bring a refreshing, creamy bite that complements the seafood.
- Sesame Oil: A few drops of sesame oil add a subtle, nutty aroma that pairs wonderfully with the seafood mixture.
- Green Onion or Chives: Finely chopped green onions or chives can be added to the mixture for a burst of fresh flavor and color.
- Furikake Seasoning: A sprinkle of furikake (a Japanese seasoning made from dried seaweed, sesame seeds, and other ingredients) will enhance the savory, umami flavor and give your mixture an extra layer of depth.
Texture and Consistency
The final seafood mixture should have a creamy consistency that holds together but isn’t too thick or too runny. It should be easy to spread over the sushi rice and layer evenly. The seafood should still maintain its distinct texture, but the creamy sauce will tie everything together and give it a rich, luscious feel.
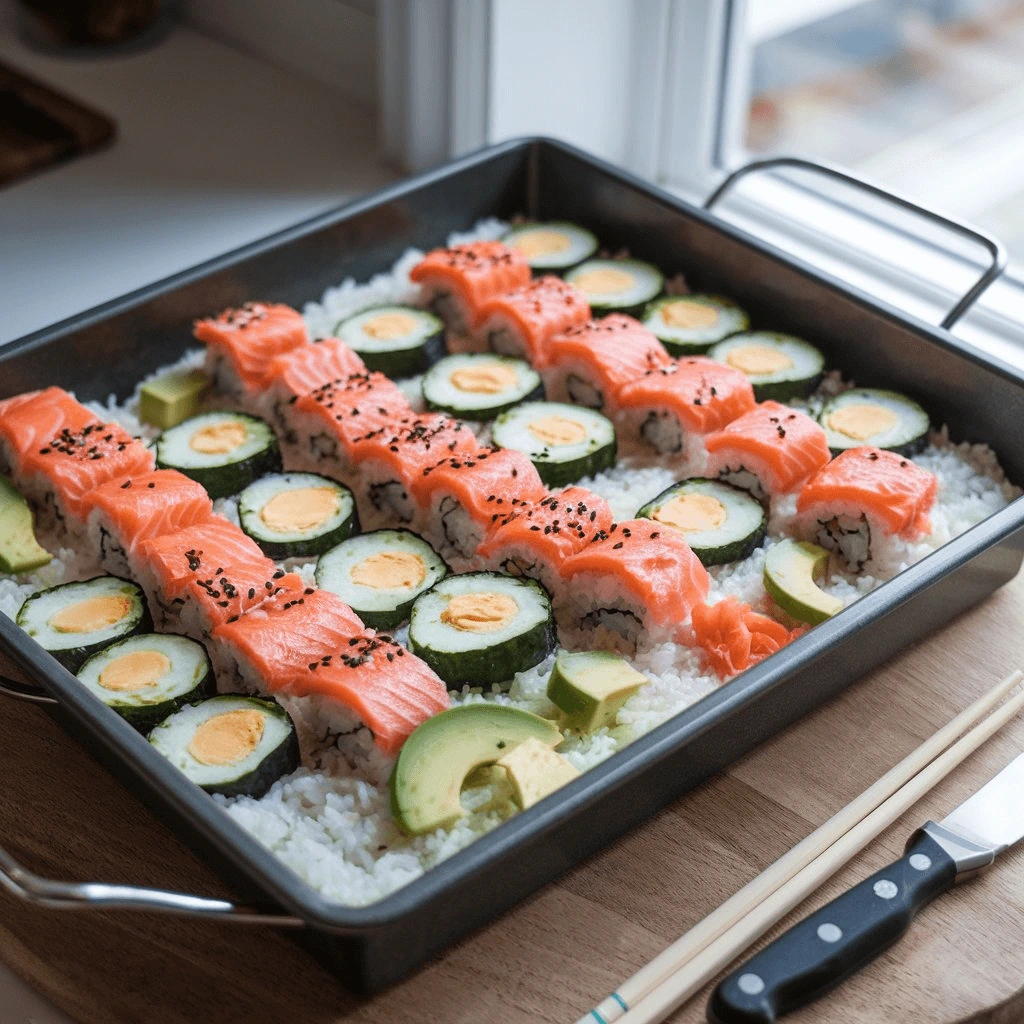
Layering Everything in a Casserole Dish
Layering is a crucial step when making sushi bake because it ensures that all the flavors meld together perfectly while keeping each element distinct. By layering the rice, seafood mixture, and any additional toppings in the right order, you create a harmonious blend of textures and flavors that will delight every bite. Let’s walk through the process of layering everything in a casserole dish to get the best sushi bake.
Start with the Sushi Rice
The base of your sushi bake is the seasoned sushi rice. This step is important because the rice acts as the foundation for everything that follows, giving structure to the dish. Here’s how to properly layer the rice:
- Spread the Rice Evenly: Once your sushi rice is prepared and seasoned, spread it evenly across the bottom of a lightly greased casserole dish or baking pan. The rice layer should be about an inch thick, so it has enough body to hold the seafood mixture on top. Be sure to press the rice down gently with a spatula or the back of a spoon to compact it slightly, making it firm enough to support the other ingredients.
- Use a Casserole Dish with a Suitable Size: Choose a casserole dish that is appropriately sized for your sushi bake. A standard 9×13-inch baking dish works well for most recipes, but if you’re making a larger batch, you can use a bigger dish. Make sure the dish is deep enough to accommodate all your layers without spilling over.
Add the Seafood Mixture
After the rice layer is in place, it’s time to add the seafood mixture, which is the star of the dish. This creamy, flavorful topping will cook to perfection in the oven, creating a golden, bubbly layer that contrasts beautifully with the rice below. Follow these steps for perfect layering:
- Evenly Spread the Seafood Mixture: Spoon the seafood mixture on top of the rice and spread it out evenly. The mixture should cover the rice completely, with no bare spots. Use a spatula to gently smooth the top, ensuring it’s an even layer that will cook evenly.
- Don’t Overload the Mixture: While it may be tempting to add a thick, heaping layer of the seafood mixture, it’s important to ensure there’s balance. You want the rice to peek through slightly, ensuring that each bite includes both rice and seafood. You also want to avoid overwhelming the dish with too much creaminess, which could make the texture too dense.
Adding a Cheese Layer (Optional)
For extra flavor and a golden, melty top, you can add a layer of cheese before baking. Creamy cheeses such as cream cheese or mozzarella are commonly used, though some people prefer to use a blend of cheeses for a more complex flavor profile.
- Spread Cream Cheese or Shredded Mozzarella: If using cream cheese, break it into small chunks and distribute it over the seafood mixture. If you’re using mozzarella or another cheese, sprinkle a thin, even layer across the top of the seafood mixture.
- Grate Fresh Cheese: For a more delicate cheese melt, grate fresh mozzarella or another cheese over the top of the seafood mixture. Freshly grated cheese melts more evenly and creates a smoother finish than pre-shredded options.
Toppings for Extra Flavor and Texture
Once the base and seafood layers are in place, you can add additional toppings to enhance both the flavor and texture. Some of the most popular options include:
- Furikake: This Japanese seasoning made with dried seaweed, sesame seeds, and sometimes fish flakes can add a savory, umami-packed crunch to the top of your sushi bake.
- Chopped Green Onions: Fresh green onions (also known as scallions) add a mild, slightly spicy flavor and a fresh burst of color that contrasts beautifully with the rich, creamy seafood mixture.
- Sesame Seeds: A sprinkle of sesame seeds (black or white) can add a nutty crunch and enhance the dish’s flavor profile.
- Crumbled Seaweed Snacks: If you want to amplify the sushi flavors, adding some nori snacks or crumbled nori sheets can bring that familiar seaweed taste to your bake.
- Sriracha Drizzle: A light drizzle of sriracha on top of the seafood mixture before baking can enhance the spicy kick and add visual appeal with a swirl pattern.
Final Layer: Furikake or Additional Toppings
Before sliding your dish into the oven, you can add a final sprinkling of furikake, sesame seeds, or extra shredded cheese for a crispy, golden finish. A light drizzle of sriracha mayo can also be applied if you want an extra creamy and spicy topping.
- Final Touch of Furikake or Seaweed: Furikake not only adds a burst of flavor but also a beautiful finish with its contrast against the creamy seafood mixture.
- Sesame Seeds: Lightly toasted sesame seeds provide a crunch that complements the soft, rich textures below.
Baking Time
Once you’ve layered all your ingredients, it’s time to bake! Place your casserole dish in the preheated oven and bake at 350°F (175°C) for about 20-25 minutes or until the top is golden brown, bubbly, and slightly crispy. If you’ve added cheese on top, the cheese should melt and form a delicious golden crust.
Serving Suggestions
Once your sushi bake is finished cooking, let it rest for a few minutes before serving. This resting time allows the dish to firm up slightly, making it easier to slice and serve.
- Serve with Nori Sheets: As you serve, pair the sushi bake with nori sheets for an added crunch and the option to wrap your sushi bake into bite-sized rolls.
- Garnish with Fresh Herbs: Fresh cilantro or chopped parsley can add a pop of color and a light, fresh flavor that contrasts nicely with the richness of the bake.
Baking the Sushi Bake to Perfection
Baking is the final step in achieving a perfectly cooked sushi bake, ensuring all flavors blend harmoniously and the top turns crisp. Follow these simple steps to get the perfect bake:
1. Preheat Your Oven
Start by preheating your oven to 350°F (175°C). This ensures that the bake cooks evenly, and the ingredients melt together without overcooking or burning.
2. Place in the Center of the Oven
For optimal baking, place your casserole dish in the center of the oven. This helps the heat circulate around the dish evenly, making sure that the sushi bake is cooked uniformly.
3. Monitor for Golden Brown
Bake for about 20-25 minutes. Keep an eye on the dish as it cooks—the top layer should turn golden brown, and the edges will begin to crisp. When you notice this, your sushi bake is almost done!
Adding the Final Toppings
Once your sushi bake is finished, it’s time to add the perfect final touches. These toppings will enhance both the flavor and appearance of the dish.
1. Furikake Seasoning
After taking your dish out of the oven, sprinkle furikake seasoning on top. This Japanese seasoning adds an umami-rich flavor, with ingredients like dried seaweed, sesame seeds, and fish flakes. The seasoning will bring a delightful crunch and extra depth to the sushi bake.
2. Kewpie Mayo and Sriracha Sauce
Drizzle Kewpie mayo over the top for a creamy finish, balancing out the rich, crispy layers. For some extra spice, add sriracha sauce on top of the mayo. This adds a subtle heat that pairs wonderfully with the creamy and crispy textures.
3. Sesame Seeds and Green Onions
For a finishing touch, sprinkle toasted sesame seeds for extra crunch. Then, add freshly chopped green onions for a pop of freshness. The green onions provide a slight peppery flavor, which perfectly complements the richness of the dish.
4. Crumbled Nori or Seaweed Snacks
Top your sushi bake with crushed nori sheets or seaweed snacks for an additional crispy texture. The seaweed adds a savory, briny flavor that reminds you of traditional sushi.
Serving Your Sushi Bake
Once your sushi bake has cooled slightly, it’s time to slice and serve.
1. Slice into Servings
Use a sharp knife to slice your sushi bake into individual portions. Aim for even slices, ensuring each one has a good mix of rice, seafood, and toppings.
2. Serve with Nori Sheets
Serve with additional nori sheets for wrapping, which allows each bite to be enjoyed like a traditional sushi roll. The nori will add an extra layer of crunch and flavor.
Tips and Variations for a Unique Sushi Bake
Sushi bake is a versatile dish that can be customized in many ways to suit your tastes. While the traditional version is delicious, there are plenty of opportunities to get creative with different ingredients, flavors, and textures. Here are some tips and variations to make your sushi bake stand out and bring something unique to your table.
1. Experiment with Different Proteins
While salmon and crab are the most popular protein options for sushi bake, you can experiment with other seafood and even non-seafood options for a twist on the traditional recipe.
- Tuna: If you love tuna, try using raw or seared tuna instead of salmon. It pairs perfectly with the other sushi bake ingredients and offers a slightly firmer texture. You could even add spicy tuna to give it an extra kick.
- Shrimp: Adding shrimp to your sushi bake can provide a delicate, sweet flavor and a different texture. Shrimp pairs wonderfully with the creamy mayo and sriracha mixture.
- Chicken or Tofu: For a non-seafood version, grilled chicken or tofu can be great alternatives. Both ingredients absorb the flavor of the seasoning and toppings, making them a satisfying choice for those who prefer plant-based or meat options.
2. Add More Vegetables for Extra Flavor and Crunch
Incorporating vegetables not only boosts the flavor but also adds nutritional value to your sushi bake. Here are some vegetables that work wonderfully:
- Avocado: Creamy and rich, avocado adds a luxurious texture to your sushi bake. Dice the avocado and scatter it over the top after baking or mix it into the seafood mixture for a soft, creamy contrast.
- Cucumber: Thinly sliced cucumber can add a crisp, refreshing bite. Consider layering it between the rice and seafood mixture to maintain its crunchy texture during baking.
- Carrots and Bell Peppers: Shredded carrots or finely chopped bell peppers can bring vibrant colors and crunch to your sushi bake. They’ll also balance out the richness of the creamy seafood mixture.
3. Spice Things Up with Sauces and Seasonings
If you like your sushi bake on the spicier side, there are several ways to add heat and complexity with different sauces and seasonings:
- Wasabi: For an extra kick, incorporate wasabi into the seafood mixture or add it as a garnish. You can also mix wasabi with mayo for a flavorful sauce.
- Chili Garlic Sauce or Sweet Chili Sauce: If you prefer a milder heat with some sweetness, drizzle chili garlic sauce or sweet chili sauce over the top before baking or after it comes out of the oven. This sauce adds a subtle spicy flavor with a hint of sweetness.
- Garlic Butter: For a rich and indulgent twist, try brushing the top of the sushi bake with garlic butter before baking. The garlic and butter flavor pairs beautifully with the seafood, making the dish even more savory and aromatic.
4. Experiment with Different Rice Variations
The rice is one of the most important components of a sushi bake, and there are ways to change things up to suit your taste:
- Brown Rice: For a healthier alternative, you can use brown rice instead of traditional white sushi rice. Brown rice has a nutty flavor and offers more fiber, adding a slightly chewy texture that complements the creamy seafood filling.
- Quinoa: For a gluten-free or higher-protein option, try using quinoa as your base. Quinoa provides a unique texture and a subtle nutty flavor, giving your sushi bake an interesting twist.
- Cauliflower Rice: If you want to keep things low-carb, you can use cauliflower rice instead of regular sushi rice. It absorbs flavors well and can be baked just like rice, though it will have a slightly different texture.
5. Switch Up the Toppings
The toppings can elevate your sushi bake, and there are plenty of ways to get creative:
- Cheese: While cheese is often used in traditional sushi bake recipes, you can experiment with different kinds. Cream cheese, mozzarella, or cheddar all work well, but you can also try smoked gouda or feta cheese for a different flavor profile.
- Crispy Onions: Adding crispy fried onions on top of your sushi bake just before serving provides a delicious crunch that contrasts perfectly with the soft and creamy layers underneath.
- Pickled Vegetables: Adding pickled ginger or pickled onions as a topping can enhance the dish with tanginess. The acidity of the pickled ingredients balances the richness of the dish and adds another layer of flavor.
- Cilantro or Mint: Fresh herbs like cilantro or mint can be sprinkled on top after baking for a fresh, aromatic finish. These herbs complement the umami flavor of the sushi bake and add a burst of color.
6. Play with Presentation
Presentation is key to making your sushi bake not only delicious but visually appealing. Here are a few ideas to serve your sushi bake in a more exciting way:
- Individual Portions: Instead of baking one large casserole, try baking individual portions in small ramekins or casserole dishes. This makes for an elegant presentation and allows each person to have their own personalized serving.
- Layered Presentation: For a visually stunning effect, try layering the sushi bake ingredients in a way that shows off the different components. Alternate layers of seafood, rice, and toppings to create a colorful and appetizing dish.
- Serving with Garnishes: Adding garnishes like microgreens, sliced radishes, or edible flowers on top of the sushi bake just before serving can make it look even more gourmet.
How to Make a Spicy Sushi Bake with Extra Kick
If you love sushi bake but crave a bit more heat and spice, a spicy sushi bake can be the perfect option for you. By incorporating spicy ingredients and bold flavors, you can elevate this dish and give it a fiery kick that complements the creamy seafood and rice. Here’s how to make a sushi bake with an extra spicy twist that will satisfy your taste buds and spice lovers alike.
1. Start with a Spicy Seafood Mixture
The base of any sushi bake is the seafood mixture, and to make it spicy, you’ll want to infuse the seafood with heat right from the start.
- Spicy Mayo: Begin by mixing Kewpie mayonnaise with sriracha sauce. Adjust the amount of sriracha based on how spicy you want the bake to be. If you want it to be extremely spicy, you can use extra hot chili paste or chili garlic sauce as a replacement for sriracha. For an even spicier kick, mix in some wasabi or cayenne pepper to really turn up the heat.
- Fresh Jalapeños or Thai Chilies: To add more layers of spice, chop some fresh jalapeños or Thai chilies and mix them directly into the seafood mixture. These fresh chilies will add both spice and a slight crunch to the dish. You can remove the seeds for a milder heat or leave them in for an extra fiery punch.
- Chili Oil or Hot Sesame Oil: To infuse a deeper, more aromatic heat, drizzle a small amount of chili oil or hot sesame oil into the seafood mixture. The oil will add a smoky, spiced flavor that complements the richness of the mayo and seafood.
2. Use Spicy Fish or Seafood
While crab and salmon are common proteins for sushi bake, you can switch things up by using spicier fish or seafood to boost the heat level.
- Spicy Tuna: Using spicy tuna is an excellent option for adding spice to your sushi bake. The spicy tuna can be made by marinating raw tuna in a spicy sauce made with sriracha, soy sauce, and a dash of sesame oil. This will add a burst of flavor and heat throughout your bake.
- Spicy Shrimp: Shrimp are great in sushi bake, but they can be even better when coated with a spicy marinade. Toss the shrimp in a mixture of sriracha, garlic, and soy sauce before layering them in the casserole dish. This will infuse them with flavor and heat.
- Spicy Crab or Imitation Crab: If you prefer using crab, consider making a spicy crab mixture. Mix the crab with sriracha, a little bit of soy sauce, and even some crushed red pepper flakes. This spicy crab will create a rich and flavorful filling that packs a punch.
3. Spice Up the Toppings
Once your sushi bake is out of the oven, it’s time to take it to the next level with spicy toppings that balance out the creamy and crunchy layers.
- Sriracha Mayo Drizzle: After baking, drizzle a generous amount of sriracha mayo over the top for an extra hit of spicy creaminess. You can also mix a little sweet chili sauce into the sriracha mayo to balance out the heat with some sweetness.
- Chili Flakes and Sesame Seeds: For additional spice and texture, sprinkle crushed red chili flakes or chili powder over the top of the sushi bake before serving. This will not only add a spicy kick but also a burst of color to the dish.
- Pickled Jalapeños or Hot Peppers: Garnish your sushi bake with pickled jalapeños or other hot pickled vegetables. These add a tangy heat that contrasts perfectly with the richness of the baked seafood and rice.
- Wasabi: For those who really love wasabi, adding a thin layer of wasabi over the top before baking or right before serving can give an additional spicy kick. Wasabi provides a sharp, pungent heat that pairs well with the creamy and savory elements of the dish.
4. Add a Spicy Crunch
Crunch is key to a great sushi bake, and when it’s spicy, it adds even more flavor and texture.
- Spicy Panko Bread Crumbs: For a spicy, crispy topping, combine panko bread crumbs with a little melted butter and some chili powder or cayenne pepper. Toast the mixture in a pan until golden and sprinkle it over the top of the sushi bake just before serving. The extra crunch will contrast wonderfully with the soft and creamy layers.
- Crispy Fried Onions: If you’re a fan of crispy fried onions, you can season them with chili powder or cayenne pepper before sprinkling them over your sushi bake. The crispy onions, combined with the heat, will add both texture and a spicy bite to the dish.
5. Pair with a Cooling Side
When making a spicy sushi bake, it’s a good idea to have a cooling side to balance out the heat. Consider serving your sushi bake with:
- Cucumber Salad: A refreshing cucumber salad with a light vinegar dressing can help cut through the heat while providing a cool and crisp contrast to the spiciness of the bake.
- Yogurt-Based Dip: A simple yogurt-based dip, like tzatziki, can also help cool down the spiciness of the sushi bake. Its creamy texture will offer relief from the heat while adding a tangy flavor.
- Cold Edamame: Serving chilled edamame with sea salt is another excellent choice to balance the spice in the sushi bake. It’s light, refreshing, and the saltiness complements the bold flavors of the bake.
Dairy-Free or Keto-Friendly Sushi Bake Options
For those following specific dietary restrictions or health-conscious lifestyles, creating a dairy-free or keto-friendly sushi bake doesn’t mean sacrificing flavor or enjoyment. With some thoughtful swaps and ingredient choices, you can still indulge in a delicious, satisfying sushi bake that meets your dietary needs. Here’s how to adjust your recipe for these two popular diets.
1. Dairy-Free Sushi Bake: Delicious Alternatives to Creamy Sauces
If you’re avoiding dairy, the creamy components of the sushi bake can be easily modified. Dairy often provides richness and texture to the dish, but there are several dairy-free alternatives to create that creamy indulgence.
- Dairy-Free Mayo: Instead of traditional mayonnaise, use vegan mayonnaise or dairy-free mayo made from plant-based ingredients such as soy, almond, or avocado. Many vegan mayo brands are available that provide the same smooth texture and rich flavor as traditional mayo. Some also come in spicy varieties, which can further enhance your sushi bake with that classic creamy spice combo.
- Coconut Milk or Coconut Cream: Coconut milk or coconut cream is an excellent substitute for dairy-based cream. It offers a luscious texture and a hint of sweetness that pairs perfectly with the savory flavors of the sushi bake. Use coconut cream in place of heavy cream to keep the richness without the dairy.
- Cashew Cream: If you prefer a nut-based alternative, cashew cream is a great option. Soak raw cashews overnight, then blend them with water to create a thick, creamy base. Cashew cream is subtle in flavor and can work well as a replacement for cream cheese or sour cream in the seafood mixture.
- Non-Dairy Cheese Alternatives: For those who love the cheesy aspect of sushi bake but want to avoid dairy, try vegan cheese options made from almonds, soy, or coconut. These cheeses melt well and provide the gooey texture of traditional cheese without the dairy. Choose a vegan cream cheese or shredded vegan mozzarella for your sushi bake topping.
2. Keto-Friendly Sushi Bake: Low-Carb, High Flavor
A keto-friendly sushi bake focuses on keeping carbohydrates to a minimum while still delivering a hearty, flavorful meal. Sushi bake can be easily adapted to fit a keto diet by making a few smart swaps that replace high-carb ingredients with low-carb alternatives.
- Replace Sushi Rice with Cauliflower Rice: The primary source of carbohydrates in sushi bake comes from the rice. To make your sushi bake keto-friendly, replace the traditional sushi rice with cauliflower rice. Cauliflower rice is low in carbs, high in fiber, and works perfectly as a base for the seafood mixture. You can sauté the cauliflower rice with a bit of sesame oil and season it with rice vinegar, just like you would with traditional sushi rice, to mimic the flavor and texture.
- Use Low-Carb Mayonnaise: For your creamy filling, continue using low-carb mayo or avocado mayo instead of regular mayonnaise. These alternatives are high in healthy fats and low in carbs, making them perfect for a keto diet. Opt for a full-fat version for extra richness.
- Opt for Keto-Friendly Nori Sheets: Traditional nori sheets are already low in carbohydrates, making them suitable for keto diets. They provide the perfect texture for serving and rolling your sushi bake. If you are looking to make this dish even more keto-friendly, you can also use seaweed snacks or seaweed sheets that are lightly salted and packed with flavor.
3. Protein Choices: Keto and Dairy-Free Options
The protein in your sushi bake can also be adjusted to fit a keto or dairy-free lifestyle. Fortunately, the options for both diets are versatile and full of flavor.
- Salmon and Tuna: Both salmon and tuna are excellent options for a keto-friendly and dairy-free sushi bake. They are rich in omega-3 fatty acids and low in carbs, making them perfect for both diets. These fish also work well with spicy seasonings and creamy alternatives, contributing to a savory, delicious base for your sushi bake.
- Shrimp or Crab: Shrimp is another fantastic choice for keto sushi bakes. It’s low in carbs and provides a sweet, juicy contrast to the other rich, savory ingredients. If you’re using imitation crab (surimi), be sure to choose one without any added sugar or fillers that may contain hidden carbs. You can also use fresh king crab or dungeness crab for a luxurious touch.
- Chicken or Tofu: For a unique twist, grilled chicken or tofu can be used in place of seafood. Grilled chicken breast is a lean, high-protein option that fits into both keto and dairy-free diets. For a plant-based alternative, tofu is a great option as it’s low in carbs and dairy-free, offering a subtle flavor that pairs well with the other sushi bake ingredients.
4. Keto-Friendly and Dairy-Free Toppings
Toppings are what elevate the sushi bake to the next level. For keto and dairy-free options, stick to ingredients that add flavor and texture without introducing unnecessary carbs or dairy.
- Keto-Friendly Sesame Seeds: Sesame seeds add a nutty, crunchy topping to your sushi bake. They’re not only keto-friendly but also provide additional nutrients like calcium and healthy fats.
- Spicy Sriracha Mayo (Dairy-Free): You can make a dairy-free spicy sriracha mayo by mixing vegan mayo with sriracha, ensuring it’s low in carbs as well. This creamy topping will give your sushi bake that signature spicy flavor while staying within your dietary needs.
- Cucumber Slices or Pickled Ginger: Cucumber and pickled ginger are refreshing toppings that won’t add carbs but will provide a burst of texture and flavor. The cucumber brings a fresh crunch, while the ginger adds a slight tang and zest.
- Avocado: Avocado is another excellent topping choice, providing healthy fats and a creamy texture. It complements the richness of the seafood and gives the sushi bake a smooth, luxurious finish without adding unnecessary carbs.
5. Enjoying Your Dairy-Free or Keto-Friendly Sushi Bake
Once you’ve made all the necessary adjustments, it’s time to enjoy your keto-friendly or dairy-free sushi bake! This versatile dish can be customized to suit your needs while still maintaining its signature flavor. Whether you’re avoiding dairy or following a low-carb lifestyle, you can rest assured that your sushi bake will be just as delicious and satisfying as the traditional version
Best Side Dishes and Sauces to Serve with Sushi Bake
While sushi bake is a delicious, satisfying meal on its own, pairing it with the right side dishes and sauces can elevate the dining experience and provide a balanced, flavorful meal. Here are some of the best side dishes and sauces to complement your sushi bake, creating a complete and harmonious meal.
1. Fresh Salad: Light and Crisp to Balance the Richness
A fresh salad is an excellent side dish to serve with sushi bake, as it provides a light, crunchy contrast to the rich and creamy flavors of the bake. You can opt for a simple cucumber and avocado salad, which brings freshness and a slight crunch. Toss in some sesame seeds and a drizzle of soy sauce or rice vinegar for added flavor.
- Seaweed Salad: A seaweed salad is another great option to pair with sushi bake. Made from various types of seaweed, this dish offers a combination of umami, sweetness, and a slight tang, making it a great complement to the sushi bake’s richness. The seaweed provides a similar flavor profile, connecting the two dishes in a seamless way.
- Mixed Greens Salad: For a more substantial side, a mixed greens salad with a light sesame or ginger dressing can bring balance to the sushi bake. The crisp greens, combined with a tangy dressing, create a refreshing contrast to the creamy, savory elements of the sushi bake.
2. Pickled Vegetables: Adding Tang and Texture
Pickled vegetables are a traditional side dish often served with sushi, and they make an excellent complement to sushi bake. The tanginess of pickled vegetables helps cut through the richness of the dish and provides a burst of flavor.
- Pickled Ginger: Pickled ginger is a classic accompaniment to sushi, and it works wonderfully with sushi bake. The sharp, zesty flavor cleanses the palate between bites, enhancing the overall tasting experience.
- Pickled Daikon or Cucumbers: Pickled daikon radishes and cucumbers are both light, crunchy, and tangy. Their subtle sweetness and acidity contrast nicely with the richness of the seafood and creamy ingredients in the sushi bake. You can also experiment with other pickled vegetables like carrots or onions to add variety.
- Kimchi: For those who enjoy bold flavors, kimchi—a Korean fermented vegetable dish—offers a spicy, tangy kick that pairs well with the sushi bake. The fermentation process adds umami and depth, creating a wonderful contrast to the creamy texture of the bake.
3. Rice Dishes: To Enhance the Sushi Theme
Although sushi bake already includes rice, pairing it with another rice-based side dish can enhance the overall sushi experience. Consider serving a light, flavorful rice dish that complements but doesn’t overpower the main course.
- Shirataki Rice: For a low-carb, keto-friendly option, shirataki rice can be a great side dish. Made from konjac yam, shirataki rice is very low in calories and carbs but still provides the texture of rice. It can be lightly seasoned with soy sauce or sesame oil to mimic the flavors of traditional sushi rice.
- Fried Rice: If you prefer a heartier side, fried rice made with vegetables, eggs, and a dash of soy sauce or teriyaki sauce can complement the sushi bake. You can also add some shrimp or chicken to the fried rice for added protein, making it a more filling side dish.
- Sticky Rice: Sticky rice is another popular rice option that pairs well with sushi. Its chewy texture and slight sweetness make it a great match for the savory sushi bake. You can enhance sticky rice with a bit of coconut milk for a creamy finish.
4. Delicious Sauces: Enhancing the Flavor of Sushi Bake
A few sauces can take your sushi bake to the next level. Whether you prefer something spicy, tangy, or creamy, the right sauce will elevate your sushi bake and add extra layers of flavor.
- Spicy Mayo Sauce: A classic sauce for sushi bake is spicy mayo, made from mayonnaise and sriracha. It’s creamy, spicy, and just the right amount of tangy. Drizzle the spicy mayo over the finished sushi bake before serving for an extra burst of flavor. You can also mix it into the seafood filling to give it a spicy kick.
- Teriyaki Sauce: Teriyaki sauce is a slightly sweet and savory sauce that adds a rich glaze to your sushi bake. A drizzle of teriyaki sauce on top of your finished sushi bake will give it a glossy finish and an extra layer of flavor. It also pairs wonderfully with grilled or broiled fish, making it an ideal complement.
- Soy Sauce and Wasabi: The classic pairing of soy sauce and wasabi adds depth and spice to the meal. Dip your sushi bake into soy sauce or spread a little wasabi on the side for a bit of heat. The saltiness of the soy sauce balances the richness of the sushi bake, while the wasabi provides a sharp, spicy contrast.
- Ponzu Sauce: Ponzu sauce, made from citrus and soy sauce, offers a tangy, slightly sweet flavor that complements the savory elements of sushi bake. It’s especially refreshing if you want to add a citrusy zing to the dish.
5. Sipping on Green Tea: A Traditional Beverage Pairing
For a soothing, traditional drink to pair with your sushi bake, serve green tea. Green tea has a delicate, slightly grassy flavor that cleanses the palate between bites and helps balance the richness of the dish. It also complements the umami flavors in sushi bake and adds to the overall Japanese dining experience.
- Iced Green Tea: If you prefer something refreshing, iced green tea works beautifully with sushi bake. It’s light, slightly bitter, and pairs well with the creamy, spicy flavors of the bake. For a twist, you can infuse your green tea with citrus fruits like lemon or lime.
6. Fresh Fruit: Sweet Ending to the Meal
To finish off your sushi bake meal on a sweet note, serve a small portion of fresh fruit. Fruits like mango, pineapple, and berries offer a light, refreshing sweetness that complements the savory flavors of the sushi bake.
- Mango and Sticky Rice: For a more indulgent dessert, serve mango sticky rice. This Thai-inspired dessert features sweet, ripe mangoes served with sticky rice and a hint of coconut milk. It’s the perfect sweet side dish to round off a sushi bake meal.
Storing, Reheating, and Serving Sushi Bake
Sushi bake is a flexible and delicious dish that can be easily enjoyed for multiple meals. Whether you’re making sushi bake ahead of time or have leftovers, knowing how to store, reheat, and serve it properly will help preserve its flavor and texture. Here’s an expanded guide for ensuring that your sushi bake is just as tasty on the second or third day.
1. Storing Sushi Bake: Keeping It Fresh for Later
Proper storage is essential for maintaining the quality of your sushi bake. Here’s how to store it for the best results:
- Cool It First: Allow your sushi bake to cool to room temperature before storing it. This prevents condensation from forming inside the storage container, which can cause the rice to become soggy. Letting it cool also reduces the risk of bacteria growth if you plan to keep it in the fridge.
- Use an Airtight Container: Once it’s cooled, transfer your sushi bake into an airtight container. This helps maintain the freshness of the dish and prevents it from absorbing any unwanted odors from the fridge. Ensure that the lid fits tightly to preserve the flavor and texture.
- Refrigeration: Store the sushi bake in the fridge if you plan to eat it within the next 2 to 3 days. The rice and seafood mixture can stay fresh in the refrigerator for this period, but the quality begins to decline after a few days. If you’re planning to enjoy it later, it’s best to eat it within this window.
- Separate Toppings: If possible, store any toppings like spicy mayo, avocado, or sriracha separately, as these can become soggy when stored with the sushi bake. Adding these toppings just before serving will keep them fresh and appetizing.
2. Reheating Sushi Bake: Restoring Its Freshness and Flavor
Reheating sushi bake requires a delicate touch to maintain its flavor and texture. Here are the best methods for reheating your sushi bake without compromising its taste:
- Oven Method (Preferred for Texture): The oven is the best option for reheating sushi bake, as it helps to restore its crispy texture and ensures the flavors are evenly reheated. Preheat your oven to 350°F (175°C). Place your sushi bake into an oven-safe dish, covering it with foil to prevent it from drying out. Reheat for about 15-20 minutes, or until it is warmed through. If you like a crispy top, remove the foil during the last 5 minutes of baking.
- Microwave Method (Quick and Easy): If you’re short on time, the microwave is a faster option but may not preserve the texture as well as the oven. Place your sushi bake in a microwave-safe container and cover it loosely with a paper towel or microwave-safe lid to trap moisture. Microwave on high for 30-second intervals, stirring in between, until the bake is heated through. Be careful not to overheat it, as the seafood can become rubbery if microwaved too long.
- Stovetop Option: If you don’t want to use an oven or microwave, you can reheat your sushi bake on the stovetop. Place a pan on medium heat and add a little oil or butter. Add the sushi bake to the pan and cover it. Stir occasionally until it’s heated through. This method can also help keep the texture intact, though it may not be as effective for reheating larger portions.
3. Serving Sushi Bake: Presenting It with Style
Sushi bake isn’t just about flavor—it’s also about presentation. Here’s how to serve this dish in a way that makes it look as good as it tastes:
- Use a Serving Platter: For family-style serving, transfer the sushi bake from its baking dish to a large serving platter. This allows guests to easily scoop out portions and makes the presentation more elegant. Top it with a few extra garnishes, such as green onions, a sprinkle of furikake, or a drizzle of sriracha for a visually appealing touch.
- Serve in Individual Portions: If you’re hosting a more formal dinner or want to make serving easier, slice the sushi bake into individual portions. This works especially well if you’re preparing it for a party or a large group. Use a sharp knife to cut neat squares or rectangles to ensure that each serving is even.
- Garnish and Enhance: Sushi bake can be customized with different toppings to make it even more appealing. Try adding some sliced avocado, a handful of sesame seeds, or a drizzle of spicy mayo for a little extra flavor and flair. Pickled ginger and soy sauce are classic accompaniments that bring out the dish’s flavors.
- Pairing with Drinks: To complement the richness of the sushi bake, pair it with refreshing drinks. A cup of green tea or sake is a traditional choice. For non-alcoholic options, serve sparkling water or iced tea. These beverages enhance the flavors of the sushi bake without overwhelming them.
4. Freezing Sushi Bake: Is It a Good Idea?
While it’s best to enjoy sushi bake fresh, you can freeze it if you have leftovers that you won’t be able to eat within a few days. However, freezing can alter the texture of the rice and seafood. Here’s how to freeze and reheat it:
- Wrap and Seal: After the sushi bake has cooled, wrap it tightly with plastic wrap or aluminum foil. For an extra layer of protection, place the wrapped sushi bake in a freezer-safe container or bag. Be sure to remove as much air as possible to avoid freezer burn.
- Thawing and Reheating: When you’re ready to enjoy the frozen sushi bake, thaw it in the fridge overnight. Reheat it in the oven following the method above, but be sure to add extra time for the freezing process. Remove the foil in the last few minutes of baking to crisp the top again.
5. Serving Leftovers: Creative Ways to Enjoy Sushi Bake
If you have leftovers or want to repurpose your sushi bake, there are several creative ways to enjoy it:
Sushi Bake Wraps: Use leftover sushi bake as a filling for lettuce wraps or rice paper rolls for a lighter, refreshing version. This works especially well if you want a low-carb alternative to traditional sushi.
Sushi Bake Sushi Rolls: You can take the leftovers and roll them up in nori sheets for a quick and easy sushi-style treat. This is a great way to enjoy sushi bake in a different form, adding a fun twist to the original dish.
Sushi Bake Bowls: Serve leftover sushi bake in a bowl, topping it with fresh sliced vegetables, extra seaweed, or a bit of soy sauce. It’s a simple and satisfying meal that still captures the essence of the original dish.
Best Ways to Store Leftover Sushi Bake
Properly storing leftover sushi bake is essential to maintain its flavor, texture, and freshness for as long as possible. Whether you have a small portion left from dinner or you’ve made a large batch to enjoy over several days, knowing the right way to store it can ensure that your sushi bake stays just as delicious when you’re ready to eat it again. Here’s a detailed guide to the best practices for storing leftover sushi bake:
1. Let It Cool Before Storing
Before storing your leftover sushi bake, always allow it to cool to room temperature. This prevents condensation from forming inside the storage container, which could make the rice and toppings soggy. Cooling the sushi bake helps preserve its texture and prevents bacteria growth, making it safer to store for later. Avoid leaving it out for too long, though, and aim to store it within two hours of cooking to ensure food safety.
2. Use Airtight Containers for Optimal Freshness
The key to storing leftover sushi bake is using an airtight container. This helps lock in moisture and prevents the dish from drying out or absorbing any unwanted odors from the fridge. A good airtight container will also keep the sushi bake fresher for longer, reducing the chance of it going stale.
Here are a few container options:
- Glass Containers: These are an excellent choice because they’re durable, non-porous, and won’t retain odors. Plus, they are microwave-safe, making reheating easy.
- Plastic Containers: If you’re looking for something lightweight and easy to store, plastic containers are a great option. Just make sure they are BPA-free and airtight to prevent leaks and preserve the flavor.
- Aluminum Foil or Plastic Wrap: If you don’t have a container, wrapping the sushi bake tightly in aluminum foil or plastic wrap can also work well. Just make sure to cover it thoroughly to avoid air exposure.
3. Keep the Toppings Separate
Sushi bake typically includes a variety of toppings such as spicy mayo, furikake, avocado, or sriracha. While these toppings add delicious flavor and texture when freshly added, they don’t always store well when mixed into the casserole. Toppings like avocado or sauces can become mushy or soggy after refrigeration, so it’s best to store them separately.
Here’s what you can do:
- Store Sauces Separately: Place your spicy mayo, sriracha, or soy sauce in a small, airtight container and keep them in the fridge until you’re ready to serve.
- Store Fresh Toppings Separately: If you plan to store toppings like avocado, seaweed, or cilantro, keep them in separate containers. You can chop and add them just before serving the sushi bake for a fresh and vibrant addition.
4. Refrigeration: How Long Can You Store Leftovers?
Once your sushi bake is properly stored in an airtight container and free from any excess moisture, it can last in the refrigerator for up to 2 to 3 days. However, it’s important to check the dish before reheating to ensure it hasn’t lost its flavor or texture. The rice can dry out over time, and the seafood or other ingredients may start to lose their freshness.
For the best results, eat your leftovers within three days to ensure you’re getting the best taste and texture. After that, the sushi bake may begin to lose its appeal and not be as satisfying to eat.
5. Freezing Leftover Sushi Bake for Longer Storage
If you don’t think you’ll be able to finish your leftover sushi bake within the next couple of days, freezing is an option for longer storage. While freezing may affect the texture of the rice and seafood, it can help preserve the flavor for a longer period. Here’s how you can freeze your leftover sushi bake:
- Wrap the Sushi Bake Well: First, wrap the leftover sushi bake in plastic wrap or aluminum foil to prevent freezer burn. Ensure that it’s tightly wrapped with no exposed areas.
- Place in a Freezer-Safe Container: After wrapping, place the sushi bake in a freezer-safe container or freezer bag. This provides an extra layer of protection and helps prevent moisture loss during freezing.
- Label with Date: To keep track of when you froze it, write the date on the container or bag. Ideally, use the frozen sushi bake within 1 to 2 months for the best taste.
6. Thawing Frozen Sushi Bake
When you’re ready to eat your frozen sushi bake, there are a couple of methods to properly thaw and reheat it:
- Thaw in the Refrigerator: The best way to thaw sushi bake is to transfer it from the freezer to the refrigerator for several hours or overnight. This allows the dish to thaw gradually and safely.
- Reheat in the Oven: After thawing, reheat the sushi bake in the oven at 350°F (175°C) for 20–25 minutes, covered with foil. Remove the foil during the last few minutes to crisp up the top and restore its texture.
7. Avoid Storing for Too Long
While sushi bake can be stored in the fridge or freezer, it’s important to note that it won’t last indefinitely. Leftover sushi bake is best enjoyed within 3 to 4 days if refrigerated and 1 to 2 months if frozen. After these periods, it’s best to discard any remaining portions to avoid eating something that’s no longer fresh or safe to consume.
8. Creative Ways to Use Leftover Sushi Bake
If you find yourself with leftover sushi bake but don’t want to eat it the same way again, consider repurposing it into something new:
- Sushi Bake Sushi Rolls: Take the leftover sushi bake, roll it in nori sheets, and enjoy it as a fun, handheld sushi roll. You can add extra veggies or sauces for more flavor.
- Sushi Bake Bowls: Scoop some of the leftover sushi bake into a bowl and top it with fresh seaweed, a drizzle of soy sauce, or pickled ginger for a tasty bowl version.
- Sushi Bake Sandwiches: For a quick lunch, scoop some sushi bake between two slices of bread or a wrap for a fusion-style sandwich or wrap
How to Reheat Sushi Bake Without Drying It Out
Reheating sushi bake without drying it out can be a bit tricky, as the rice and seafood can easily become tough or lose their flavor when exposed to high heat. However, with the right techniques, you can restore the dish’s original texture and taste, ensuring it’s just as delicious as when it was first baked. Here are some effective ways to reheat sushi bake without losing its moisture or quality:
1. Reheating in the Oven: The Best Method
The oven is the ideal way to reheat sushi bake, as it helps retain moisture while crisping up the top layer without overcooking the dish. Here’s how you can do it:
- Preheat the Oven: Start by preheating your oven to 350°F (175°C). A moderate heat ensures that the sushi bake will warm evenly without drying out.
- Cover with Aluminum Foil: To prevent the sushi bake from drying out, cover the dish with aluminum foil. This traps steam and moisture inside, keeping the rice and seafood from becoming dry or rubbery. Be sure to loosely cover the casserole dish to avoid the foil sticking to the top of the dish.
- Reheat for 15-20 Minutes: Place the covered dish in the oven and reheat for about 15-20 minutes. Check the temperature with a food thermometer to ensure it’s reached 165°F (74°C) for safe consumption. If the top of the sushi bake needs more crisping, remove the foil in the last 5 minutes to let it brown slightly.
- Serve Immediately: Once heated through, remove the sushi bake from the oven and serve immediately for the best taste and texture.
2. Reheating in the Microwave: Quick and Convenient
The microwave is a faster option for reheating sushi bake, though it can sometimes cause the rice to become a little drier or rubbery if not done carefully. However, with the right technique, you can still preserve moisture. Here’s how to do it:
- Place in a Microwave-Safe Container: Transfer your leftover sushi bake into a microwave-safe dish. Use a container that has a lid or cover the dish with a microwave-safe plastic wrap to trap moisture while heating.
- Add a Small Amount of Water: To prevent the sushi bake from drying out, sprinkle a little water over the rice and seafood mixture. This small amount of moisture will help steam the dish, keeping it moist and tender. About 1-2 tablespoons should be enough, depending on the portion size.
- Heat on Low Power: Set your microwave to low or medium heat. Start by microwaving the sushi bake in 1-minute intervals to check its progress. Stir gently between intervals to ensure it heats evenly. You may need 2-3 intervals to fully heat the dish.
- Cover and Let It Sit: Once heated, allow the dish to sit covered for a minute or two. This helps the heat to distribute evenly and ensures the dish stays moist.
3. Reheating on the Stovetop: For a Slightly Crispy Texture
If you don’t have access to an oven or microwave, you can also reheat sushi bake on the stovetop. This method provides the benefit of a slightly crispy texture on the bottom while maintaining moisture in the middle. Here’s how to do it:
- Use a Non-stick Skillet: Select a non-stick skillet or frying pan, which prevents the sushi bake from sticking to the bottom. Heat the pan over medium-low heat.
- Add a Little Water or Broth: Before placing the sushi bake in the skillet, add a small amount of water or broth to the pan (just a few tablespoons). This helps create steam, which will prevent the rice from drying out while it reheats.
- Cover with a Lid: Place the sushi bake into the skillet and cover it with a tight-fitting lid. This traps the steam and heat, keeping the dish moist as it reheats.
- Heat Gently: Heat the sushi bake for 5-7 minutes, checking occasionally to ensure it’s not burning. If necessary, reduce the heat to low. After the dish is heated through, remove the lid and check if the rice has crisped up slightly at the bottom. If you prefer a crunchier texture, leave the lid off for the last minute or so.
4. Reheating Tips for Specific Toppings
Some toppings, like avocado or seaweed, don’t store or reheat as well as others. These can become soggy or mushy when heated. Here’s how to handle these toppings separately:
- Remove Fresh Toppings: If your sushi bake has fresh ingredients like avocado, seaweed, or cucumber, remove them before reheating. These ingredients are best added after reheating to maintain their crispness and fresh flavor.
- Reheat the Base and Add Toppings Later: When the sushi bake base (rice and seafood mixture) is fully reheated, add fresh toppings right before serving. This keeps the texture of these ingredients intact.
5. Reheating Sushi Bake in Portions
If you have a large batch of sushi bake left over, consider reheating only the portion you plan to eat. This reduces the chances of overcooking the entire dish and helps maintain its freshness. Simply divide the sushi bake into smaller portions and follow the reheat methods mentioned above for the best results.
Creative Ways to Enjoy Leftovers
Sushi bake leftovers offer an opportunity to experiment with new flavors and create exciting dishes. If you’re tired of reheating the same meal, try these creative ways to use your leftover sushi bake. These ideas not only offer a fun twist on the classic but also ensure that nothing goes to waste. Here are some unique ways to enjoy your sushi bake leftovers:
1. Sushi Bake Onigiri (Rice Balls)
Turn your leftover sushi bake into portable, hand-held rice balls, or onigiri. These Japanese rice balls are typically filled with ingredients like pickled plums or salmon, but you can use your sushi bake filling for a unique twist.
- How to Make It: Start by forming the leftover sushi bake into small portions of rice and seafood mixture. Shape them into triangular or oval shapes. You can also add a little extra seasoning or a drizzle of soy sauce to enhance the flavor. Wrap the onigiri with a sheet of nori to keep everything together.
- Why It Works: The compact shape of onigiri makes it a great option for a snack or a quick lunch. Plus, the sushi bake ingredients blend perfectly into the rice, making each bite flavorful.
2. Sushi Bake Tacos
If you’re craving something fresh and crunchy, consider transforming your sushi bake leftovers into sushi bake tacos. This is a fun and fusion-style dish that combines the concept of sushi with a taco shell.
- How to Make It: Warm up your leftover sushi bake and then spoon the mixture into soft or crispy taco shells. You can add additional toppings like avocado slices, pickled ginger, and a drizzle of spicy mayo or sriracha for extra flavor.
- Why It Works: The crunchy taco shell contrasts perfectly with the creamy and savory sushi bake mixture. It’s a creative way to enjoy sushi in a whole new form.
3. Sushi Bake Wraps
Another quick and innovative way to use leftover sushi bake is by turning it into sushi wraps. These are similar to sushi rolls but in a more casual, easy-to-eat format.
- How to Make It: Use a nori sheet or rice paper to wrap your sushi bake leftovers, adding a little extra seasoning or fresh ingredients like cucumber, avocado, or thinly sliced carrots. You can roll it tightly like a burrito or wrap it up sushi-roll style.
- Why It Works: These wraps are portable, flavorful, and can be eaten with your hands, making them a great option for picnics, lunchboxes, or a fun snack.
4. Sushi Bake Quesadilla
For a cross-cultural fusion experience, why not turn your sushi bake leftovers into a sushi bake quesadilla? This combination of Mexican and Japanese flavors offers a savory and cheesy twist on your traditional sushi bake.
- How to Make It: Take two flour tortillas and fill them with your leftover sushi bake mixture. Add shredded cheese (such as mozzarella or cheddar) and a little sriracha or spicy mayo for extra zing. Heat the tortillas in a pan until they are crispy on both sides and the cheese has melted.
- Why It Works: The gooey cheese blends beautifully with the sushi bake filling, and the crispy tortilla provides a satisfying crunch. This fusion-style dish combines comfort food with Japanese sushi flavors.
5. Sushi Bake Salad
Transform your leftover sushi bake into a refreshing sushi bake salad. This option gives you a light and healthy way to repurpose your meal without losing the core flavors.
- How to Make It: Start by placing a bed of mixed greens (such as spinach or arugula) in a bowl. Then, top the salad with the leftover sushi bake mixture. Add fresh ingredients like avocado, edamame, and sliced cucumber. Drizzle with a sesame dressing or a tangy rice vinegar dressing to bring everything together.
- Why It Works: The combination of warm sushi bake on top of cool greens makes for a satisfying contrast of temperatures and textures. Plus, it adds a refreshing element to the rich and creamy flavors of the sushi bake.
6. Sushi Bake Pizza
For a unique and fun twist, try transforming your leftover sushi bake into a sushi bake pizza. This dish combines the comfort of pizza with the familiar flavors of sushi in a creative and exciting way.
- How to Make It: Use a pizza crust (store-bought or homemade) and spread a thin layer of leftover sushi bake on top. Add additional ingredients like cream cheese, spicy mayo, or a drizzle of eel sauce. Bake in the oven for about 10-15 minutes until the crust is golden and crispy.
- Why It Works: The sushi bake mixture becomes the perfect topping for the pizza crust, creating a delicious fusion of flavors. It’s an unexpected way to enjoy sushi and makes for a fun meal to share with friends and family.
7. Sushi Bake Omelet
For a breakfast or brunch option, turn your sushi bake into a savory omelet. This is a quick and easy way to enjoy the sushi bake mixture in the morning.
- How to Make It: Whisk together eggs and pour them into a heated, lightly greased skillet. Once the eggs start to set, spoon your leftover sushi bake mixture onto the center. Allow it to cook for another 2-3 minutes until the eggs are fully set, then fold the omelet and serve.
- Why It Works: The creamy texture of the sushi bake pairs wonderfully with the soft, fluffy eggs. It’s a comforting and filling way to enjoy your leftovers for breakfast or brunch.
8. Sushi Bake Casserole
If you want to stretch your leftovers into a new meal, transform your sushi bake into a casserole. By layering it with other ingredients, you can create a hearty and satisfying dish.
- How to Make It: Combine your leftover sushi bake with a base of cooked quinoa, noodles, or rice. Layer the ingredients in a baking dish, and top with additional cheese or breadcrumbs. Bake in the oven at 350°F (175°C) for 15-20 minutes until everything is heated through and golden brown on top.
- Why It Works: The casserole format allows you to create a comforting, filling meal with just a few additional ingredients. It’s a great way to use up leftovers without it feeling repetitive.
Conclusion
Sushi bake is not only a delicious and versatile dish but also a fun and creative way to bring the flavors of sushi to your home without the complexity of traditional sushi rolling. Whether you’re new to sushi bake or a seasoned pro, this dish offers a unique twist on the classic Japanese treat. The combination of seasoned sushi rice, seafood, and flavorful toppings creates an irresistible flavor profile that can easily be customized to suit any taste.
What makes sushi bake even more appealing is how adaptable it is. From choosing the right proteins to experimenting with different toppings and sauces, the possibilities are endless. You can make it spicy, creamy, or even dairy-free, depending on your dietary preferences. Plus, it’s a fantastic dish for meal prepping and sharing with family and friends, making it perfect for gatherings or cozy dinners at home.
The step-by-step guide helps you through the process of making this dish from scratch, ensuring a perfectly layered and baked meal every time. As you become more familiar with the recipe, you can experiment with creative variations like sushi bake tacos, wraps, or even casseroles, which are all excellent ways to enjoy leftovers.
Finally, knowing how to store, reheat, and serve your sushi bake ensures that you can enjoy this delightful dish more than once. And with the many creative ideas for using leftovers, you’ll never get bored of this tasty treat.